Sunday 19 May 2024

Sunday Snippets - all I see is magic

A fairly quick card from me, using a couple of NBUS items: 


Just a couple of snippets left, the outline from the stamp die (close call there!) and a piece of the green backing card

I used:

- 5.5" x 4" pale ivory linen card blank - tent style

- first step was to use a snippet of pale ivory linen card to die cut the stamp outline - using a die from Penny Black's 'posted cut out' set of dies

- then trimmed the Penny Black 'Masterpieces Made Easy' panel, from the 'take me away' set down to fit neatly inside the stamp serrations outline, and glued it in place

- stamped the post mark onto the image panel using a stamp from the matching Penny Black 'posted' set of stamps and a VersaFine Clair 'Morning Mist' ink pad

- at that point I could work out where to stamp the sentiment, using a VersaFine Clair 'Morning Mist' ink and a stamp from the Funky Fossil 'Making Memories' set of stamps (part of the current Snippets Challenge prize)

- then mounted the 'stamp' panel onto a rectangle snippet of toning green card, measuring 4" x 3", using thin foam strips and the 'glue stick trick'

- finally, glued the front panel onto the card front - and called it done!

I used a few snippets. The pale ivory linen card base is not strictly a recognised size, but it works for me as it's left over after cutting a tent style A2 sized card AND saves on A4 card wastage too. The pale ivory linen card for the stamp shaped outline was a snippet - as was the green backing card.

I'd like to enter this card into the following challenges:

- Darnell's NBUS challenge #62 - HERE - the Penny Black die set and the matching stamp set were having their first outing.

- Allsorts Challenge # 781 .... see more below!

The Allsorts Challenge are celebrating their 15th Birthday this week! Lots of lovely prizes to be won as well - do please join in with the fun. Brenda and her team are amazing and your support would be lovely! 


Dudley Pupdate: Dudley forgot himself and did a little puddle on Friday when Len returned after a short trip out. Basically over excitement at seeing that his Dad hadn't run away ..... for all of 30 minutes! He wasn't chastised at all - but he sure knew he'd broken a house rule and sat to one side as Len cleaned up, with his head bowed in shame, whilst I had to resist picking him up to comfort him, not allowed anyhow for the time being.

It's been a stressful week for him with me having my first cataract surgery 10 days or so ago (hence the sentiment I used on today's card) as he still hates travelling in the car to and from the Hampshire Clinic treating me.

Me? Doing really great - one down and the other one to be replaced at the end of May! What a fantastic difference already! Who turned on the bright light and opened the yellow net curtain? Happy Bunny so far. 

Remember, the results from Challenge #479 are now published in the Snippets Playground HERE. 

Hope to see you on the swings for the current challenge too as that runs for almost another week.

AND, my card today used another one of the Funky Fossil sentiment stamps in the current Challenge #480 prize bundle. I really love this sentiment, obviously! 

Love as always, Dudley and yours truly,


Sunday 12 May 2024

Sunday Snippets - every picture tells a story

I pulled out a snippet of navy blue pearlescent card and a few snippets of 'Pale Ivory' linen effect card to make my snippets card for today:

Very sorry, no photo of the snippets this time - they were rather unexciting and had been disposed of before I thought to take a photo!

I used:

- 5.5" x 4" pale ivory linen effect card blank, tent style

- snippets of the same pale ivory card as well as snippets of Tonic's 'Navy Dazzle' card stock for the remainder of the card

- used a NBUS set of Waffle Flower dies called 'Wooden Frame' to die cut and emboss the main rectangle as well as the oval frame from navy blue card snippets - set those aside for now

- dry embossed a snippet of pale ivory linen effect card using Cuttlebug's 'Script' folder, trimmed it to fit to the back of the navy rectangular frame and adhered it in place, before setting it to one side again

- out came the Misti and I stamped the flower and the bee, using VersaFine Clair 'Morning Mist' ink - on the reverse side of the pale ivory card (no linen effect on the reverse, which is handy). The stamps are from a NBUS set of stamps by Hobby Art, called 'Happiness Blooms'

- then stamped the sentiment in readiness, using the same 'Morning Mist' ink pad and a stamp from the fabulous Funky Fossil 'Making Memories' set of stamps - NBUS and set to be a favourite here - on the reverse side of the pale ivory card again

- die cut the sentiment using the oval frame die from the 'Wooden Frame' set of dies - so that the piece would sit perfectly in the oval frame aperture. I did need to cut a smaller oval by hand to back the piece, for adhesion and stability

- coloured the stamped flower and bee using Polychromos pencils and Sansodor blending solution. The bees wings are the palest blue, winked with clear Stella, pretty!

- trimmed the flower and the bee images using tiny Fiskars scissors to leave a narrow white outline 

- at that point I added the rectangular frame to the card front, using thin strips of foam tape and the glue stick trick

- next popped the flower in place, using mini glue dots, to cope with the embossing -  then the bee using a small piece of thin foam pad

- then came the stamped sentiment oval - added using thin strips of foam tape below the rectangular frame and a glue pen for the top portion to keep it all level

- final touch - some tiny Memory Box clear Fairy Drops! I love these!

The card is slightly under USA A2 size as I decided, before assembling it, to trim the A2 card by one quarter inch from one side - glad I did that for better balance!

I'd like to enter this card into the following challenge:

- Darnell's NBUS challenge #62 - HERE . The two stamp sets and the set of frame dies are all NBUS. 

Dudley Pupdate: Arnie is still his doggie bestie! They met up on Wednesday as Arnie was on his way home and Dudley was just setting off for a walk. The non-stop hugging and dancing was such a delight to watch. It went on until they both flopped down on our driveway, totally worn out!  

Mind you, Dudley ended up in Len's bad books on Saturday - little scamp managed to find a hedgie 'calling card' in the back garden and was in ecstasy, rubbing all over it right down one side! Len was pretty cross, didn't take any prisoners and just cut away the offending patch of hair! From a recently shorn Dudley as well! I daren't even take a look. I suspect he (Dudley of course) is headed for a bath ............ anytime now!

Remember, I've just kicked off a new challenge over in the Snippets Playground HERE. Hope to see you on the swings, goodness knows what Sarn has in her satchel this week! If it chinks and sounds like a bottle of hooch - I'm confiscating it! 

Love as always, Dudley Dog and me


Sunday 5 May 2024

Sunday Snippets - Christmas wine anyone?

Hooray, we've had a few sunny days here - and not before time either.

Whilst idly browsing online around unbranded dies, I came across such a fun wine glass die set. This is how I used it for my snippets card today:

Left over snippets, fished out of the waste bin! Amazing how the light above the top of the pile washed out the red of the rich Tonic card to almost pink!

I used:

- 5.5" x 4.25" white card blank, side opening

- for the main outside frame I used Tonic's mirror 'Inca Gold' card, trimmed to 5.25" x 4" - and set it to one side for now. Resist the temptation to always build up a card directly, layer by layer, onto a card front - far better to build up most or all of the front panel and then glue it together in the proper order - simple advice I was given when first card making and, for me, it always works best! 

- then trimmed a Kaisercraft 'Blue Bay' wooden planks effect piece of 6" x 6" paper to 5" x 3.75" - and set it to one side 

- obviously, I already had the snippets I wanted to use out on the desk before selecting the two layers to form the backing frame so out came the Altenew Blossom Mini die cutter and off I went!

- first of all used a snippet of Tonic's iridescent  'Firestone Red' to die cut the wine glass. The die set is unbranded but I've never seen it before under licence - fingers crossed! The wine glass die is actually shaped slightly 'on the wonk' so it isn't anyone's eyes - perhaps Santa already had a tipple!

- then spent a quiet hour or so half watching You Tube whilst cutting out the belt and buttons (Tonic Black Velvet), buckle (Tonic Mirror 'Inca Gold') - and what I assume is Santa's beard from plain white card - ALL of them were snippets. In fact, I double layered them all for dimension - being a bit soft in the head!

- fully assembled the Santa wine glass and put it to one side

- glued the gold and wooden planks backing layers together using Collall All Purpose glue, then added the made up Santa wine glass, for that I used a glue pen

- adhered the panel onto the card blank using  thin foam stripe and the glue stick trick

- die cut the sentiment using a Creative Expressions die set - 'Lisa Horton's Borderline Ho Ho Ho'. I like this little die set but it IS tricky to line up and cut properly IMHO. Sadly I find that with a few of Lisa's designs

- for the sentiment I used snippets of Tonic 'Inca Gold' and also parchment paper
 - gluing them together as I went

- glued the 'Ho Ho Ho' sentiment across the stem of the glass using a mix of glue pen as well as mini glue dots at either end of the sentiment strip to both raise it and also beI invisible

- finished!

I'd like to enter this card into Darnell's NBUS Challenge #62 HERE- the die sets were both having their first outing.

And, into the current Allsorts Challenge, under the 'Anything Goes' rule.  Allsorts are celebrating their 15th Birthday on 18th May - with lots of lovely prizes too!

Dudley Pupdate: During the week, I was sitting on our bed, folding some laundry, ably assisted by Dudley of course. Suddenly there was a little scuffle against the bedroom window and there sat a rather pretty little pigeon on the outside window ledge. Dudley immediately woofed 'Go away you interloper' at the bird. It blinked and settled down. Nonplussed at his lack of 'authority' - Dudley trotted over to the window. popped his paws up on the wall and stretched as high as he could - to give a few more 'Go away' woofs. The bird stayed settled down. 😂 So Dudley shrugged then decided to join it, curled up at my feet and had forty winks!

Since then, Len has given Dudley a really good trim - he looks like a newborn lamb! But. he took it all in his stride, if you ignore the few 'Dudley doing the Egyptian sand dance' moves around the grooming table. 

Very importantly, the results of Challenge #478 are now published HERE . 

Do please come and play in Sarn's current challenge over in the Snippets Playground! Just scroll down.

Love from myself and Dudley, xxx


Sunday 28 April 2024

Sunday Snippets - Birthday Celebrations!

Very recently a special friend celebrated her Birthday and this is the card I made for her: 

I used: 

- 5.5" x 4.25" white card blank, side opening

- a snippet of Tonic pearlescent 'Luna Silver' card, trimmed to 5.25" x 4" and set to one side

- a snippet of white card trimmed to 5" x 3.75", with a round stitched aperture die cut using Marianne's set of dies - CR1630

- next step was to stamp a sentiment - I used a Delicata 'Silvery Shimmer' ink pad and a stamp from Penny Black's 'Special Thoughts' set. Originally I'd planned to then clear emboss the stamped sentiment but the match to the pearlescent  silver backing card was so spot-on that I decided not to risk ending up with too shiny a look

- amongst my more precious snippets I'd been saving a lovely embossed piece of white card, used by a friend  to protect a card she sent to me some time ago - so I backed the aperture I'd cut into the white layer with it

- and then the fun began! I die cut two layers from snippets of SU's 'Certainly Celery' card using a die by Jeannie's Art called 'Butterfly Touch - Butterfly Corner'. I'd had the die for some time and this was a first play as I'd half suspected it would be tricky - and I was right as the die cuts seemed to have a life of their own when I was gluing the layers together!

- used snippets of some Lindy's Magical Shaker backgrounds to die cut the teeny little butterflies in pink and lilac and glued them on top of the butterflies that are part of the main die - wham! Suddenly the die cut really came alive

- I added three butterflies to the bottom right hand corner of the card front to add more balance and popped a teeny little flat backed silver gem onto each butterfly

- final step was to layer the finished white panel onto the 'Luna Silver' one,  then add it to the card front using narrow foam strips (Amazon sell them HERE) and of course I used the 'glue stick trick' 

- finished!

Apologies, I did use a lot of snippets, all are mentioned in the words above but totally forgot to take a before or after photo of them!

I'd like to enter this card into Darnell's NBUS Challenge #61 HERE, the Marianne set of dies was having a first outing

Dudley Pupdate: Nothing stunning to report, with the recent reasonable weather Dudley is actually enjoying his walks rather than tiptoeing around puddles! Bring on the sunshine. 😀

Sarn has just kicked off a new challenge over in the Snippets Playground HERE. Hope to see you on the swings, after last week's St George's Day pantomime, complete with Dudley dressed up as a fire breathing baby dragon, I dread to think what sh'e got planned for this week!! 

Love as always, Dudley Dog and me,


Thursday 25 April 2024

Rudolph Days - April 2024

I was delighted when my entry into Rudolph Days Challenge in March was picked as one of the top three. And am even happier to be this month's Rudolph Days Guest Designer HERE - thank you so much Helen! 

This is my card:


I used:

- 5.5" x 4.25" white card blank, side opening

- a backing piece of Tonic pearlescent 'Red Velvet' card, trimmed to a whisker under the size of the card front

- a snippet of really lovely holly patterned silver card, which I think was used by a friend to protect the Christmas card she enclosed it with - and I've saved it ever since, today is its day to take a bow!

- die cut the snippet of silver card using a die from the Taylored Expressions 'Petite Scallop Rectangle Stacklets' set, to make the main front panel. There was literally just a whisker of waste left on all four sides after the cutting was done

- used a snippet of white card and trimmed across it using a Spellbinders 'Curved Edge' with a line of stitching die

- then die cut the bottom edge and up the sides in one do using the scallop edge die I'd used on the silver background 

- glued the white piece onto the bottom of the silver panel

- glued the red layer and the silver panel onto the card front

- then came the drawn out part - die cutting the deer and all the extra bits and bobs ..... all from snippets using a Spellbinders die set called 'Magical Deer'

- the white body and head are double layered and the 'beard' plus the  piece down the centre of the face were die cut using a snippet of 'pale ivory' linen card, on the reverse smooth side

- the little cutouts on the deer's face and body were backed with snippets of red velvet card - used the same red velvet card for the cover/saddle  over the reindeer's back

- the antlers were die cut using a dark brown card snippet, which I then topped with second layers, die cut from a snippet of black velvet card

- the little hooves and nose are die cut from black velvet card and the ears and tail had a little bit of pink die cut card added

- ran away for a rest

- glued the main body with the additional pieces in place to the card front

- then used very narrow red line tape to stick the bottom part of the antlers to the back of the deer's head before adhering it to the image using glue pen for the antlers and small pieces of thin sticky pad for the actual head - to give it some dimension

- die cut a selection of red, pink and white flowers and adhered them to the deer's antlers

- final touch - added some tiny flat silver gems to the flower centres - plus one last cheeky one, right in the centre of the deer's cover/saddle

- tottered away ................ and lay down in a darkened room to recover!

This might well be the only time I ever use this die set - I just counted 32 die cut shapes, 34 if you count the double layering of the main body and head. It seemed to be never ending!

Didn't add a sentiment as it's already busy enough. Besides, reindeer in snow with a background of holly patterned paper and sparkly touches sort of points to Christmas, IMHO.

I'd also like to enter this card into the following challenges:

Christmas Kickstart Challenge #85 HERE. The theme is 'Santa and his Sidekicks' - any deer surely is one of the best known of Santa's sidekicks!

Darnell's NBUS Challenge #61 HERE. The 'Magical Deer' set of dies was having its first (and possibly last) outing here.

You have until the end of the month to enter all three challenges I've linked to in this post. Go on, you know you want to.


Sunday 21 April 2024

Sunday Snippets - Penny Black Stickeroo to the rescue

It's been another one of those weeks here, where time just flies by. I suddenly realised on Friday that I needed to make a snippets card - having been focused on other cards, as well as other stuff going on here. I reached out for the little packet of Stickeroos that I keep close at hand, already mounted onto snippets of toning card - and within 30 minutes had produced this:


I used:

- 4.75" square pale ivory linen card blank - tent opening

- then die cut the Penny Black Stickeroo on its snippet backing layer of SU 'Certainly Celery' card using a Marianne Craftables 'Stitched Circle' die - CR1360. The Stickeroo is from the Penny Black 'Gentle Blooms' sheet of stickers BTW

- I then used a NBUS die from Gummiapan called 'Scalloped Pointy Border', bought a while ago in one of their sales, and cut part of the bottom of the card front away

- found a piece of deep teal blue card to pick out the colour of one of the flowers, trimmed it to 4.75" square and glued it to the inside of the card front

- finally, used thin sticky pads (and the glue stick trick) to adhere the image to the pale ivory portion of the card front - didn't add a sentiment as it's a 'general purpose' card

- finished!

I only used one snippet - the backing layer for the Penny Black Stickeroo.

I'd like to enter this card into the following challenge:

- Darnell's NBUS challenge #61 - HERE - the Gummiapan Scalloped Pointy Border was having its first outing as well as the Marianne set of stitched circle dies. 

Dudley Pupdate: Before long, Dudley will need a bath as a slight doggy 'hum' is faintly there when you snuggle up really close to him. He has hair, not fur, therefore is less prone to 'doggy hum'. But, he's due an application of anti-flea and worming meds between his shoulder blades and we like to leave a week either side of that before any baths. So, I bought some proper 'doggy cologne' - which actually smells like baby powder, very much like his shampoo. On Friday I gave him a couple of sprays down his back to test it out and the result was hilarious. 

As a result we had wild 'zoomies' all around the house - followed by a lot of rolling and rubbing, same as after a bath! As well as some well choreographed wiggly hip moves! So funny .......... I half expected him to get up on his hind paws and launch into a John Travolta Saturday Night Fever Bee Gees 'You Should Be Dancing' routine! Never a dull moment. Check the link then imagine Dudley in John T's place! Snort. 😉

Remember, the results from Challenge #477 are now published in the Snippets Playground HERE. Hope to see you on the swings for the current challenge too as that runs for almost another week.

Love as always, Dudley and yours truly,


Sunday 14 April 2024

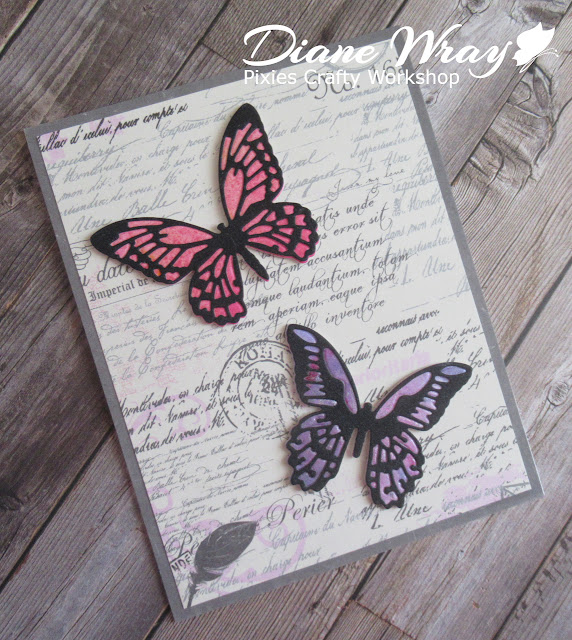
Sunday Snippets - Butterflies!

Here's my snippets card for this week:

My leftover snippets - yay, I remembered to take a photo!
I used:

- 5.5" x 4.25" white card blank, tent style 

- grey backing paper from Echo Park's 'Be Mine' paper pad (it's actually the reverse of a sheet printed, using the same grey that features in many of the designs - handy 😀), trimmed to the same size as the card front and glued in place 

- another sheet of paper from the same pad, this time patterned, trimmed to 5.25" x 4" and glued in place on top of the grey layer

- then came the snippets - the previous day I found some offcuts of Strathmore Mixed Media card and played around making backgrounds using Lindy's Magical shakers - all from the 'Tea and Crumpets' range

- I chose to die cut the black top layers from a snippet of black 'velvet' card' first, using two dies from the Sizzix 'Detailed Butterflies Mini' set and put them aside for now

- used the leftover apertures so I could choose whereabouts from the backgrounds to die cut the bottom layers of the butterflies

- die cut the bottom 'solid' layers from the backgrounds already made using 'Lindy's Shakers', then ran them through the Gemini to emboss them, using the same dies

- glued the black die cut layers onto the embossed base layers

- final step was to add both butterflies to the card front, using snipped up thin sticky pads

It's a shame that the shimmer doesn't show up - especially in the purple butterfly. The embossing step was SO worthwhile, again in real life!

I'd like to enter this card into the following challenge:

- Darnell's NBUS challenge #61 - HERE - the butterfly die set I used is NBUS, 

Dudley Pupdate: At last, we've had some sunshine here and the difference it's made to Dudley is so heartening. He adores playing in the dry back garden, zoomies are his speciality, some lovely dry walks and he races back indoors with such a sweet lopsided grin on his face! Happy dog, happy home!

Remember, I've just kicked off a new challenge over in the Snippets Playground HERE. Hope to see you on the swings!

Love as always, Dudley Dog and me,


Sunday 7 April 2024

Sunday Snippets - THAT postage stamp die set

Spring is really teasing us here - temperatures are rising at times and the sound of lawnmowers drifts across to us - in our easy care revamped garden. Len is a happy guy for sure, and the wildlife still visit as well. But then it rains and blows a 'Hoolie'! 

Very last minute snippets card from me - using one of the currently hugely popular 'postage stamps' set of dies in 'simple mode':

My leftover snippets of the 'Certainly Celery' papers - sob, only a few tiny scraps left now
I used:

- 5.5" x 4.25" white card blank, side opening

- first of all I used white card, the same as the card blank, to die cut the main outline of the card topper using an unbranded die 

- then trimmed some plain SU 'Certainly Celery' card for the bottom layer and also some deep purple slightly shimmery paper for the next layer

- glued both those layers onto the card front

- then die cut the snippets of SU's 'Certainly Celery' paper pack, using the dies to match the faux apertures in the main outline

- glued the patterned snippets onto the outline die cut, using a glue pen

then used the same glue pen to glue the whole outline panel onto the card front

- stamped the sentiment onto a snippet of white card, using a LOTV stamp from their sadly discontinued and still very much loved by yours truly 'General Greetings - Small' set of stamps - using a VersaFine Clair 'Monarch' ink pad (gorgeous colour!)

- used a SU plain small oval punch to punch out the sentiment

- used a snippet of the left over purple glimmer paper to punch out a SU scalloped small oval

- glued the white sentiment onto the purple scalloped oval

- used thin sticky pads to adhere the completed sentiment to the card front 

- added a strip of the patterned paper to the envelope flap and called it finished

I learned a few things along the way. The idea of using papers from the same colour range is better in theory than in practice.  In real life the card does them justice, but on camera and unless you're close up they really are too similar to give it that 'Wow' factor. Tiny backing layers of the purple paper to frame each of the 'Certainly Celery' panels would give more definition - but I thought of that one too late. The way to do that, IMHO, would be to die cut the purple layers for each 'aperture' then do the same with  the patterned paper but also trim a little sliver from the top and one side of those patterned papers to create a narrow margin all round the patterned paper layer. Next time, I might well give that a whirl!
 
I'd like to enter this card into Darnell's NBUS Challenge #61 HERE - the die set was having its first outing.

Dudley Pupdate: For the past week or so, Dudley has been rather subdued. He's eating fine but he's often in a little dream world of his own. Physically everything is working as normal but we're watching him closely and he will be off to the vet if need be - before he can even say 'I wanna treat for going'!  It could just be that, like us, he's fed up with all the damp weather and longing for Spring to arrive properly.

Having said that - he still put up a jolly good fight on his hind legs when I was grooming him yesterday afternoon. Overall the match was a draw, although I'm sure that Dudley scored a few below the belt hits! What can you do when a little fluffy white face with beautiful eyes plants itself on your 'chest shelf' and silently appeals 'Enough Mama, enough please!'?

Very importantly, the results of Challenge #476 are now published HERE

Do please come and play in Sarn's current challenge over in the Snippets Playground! 

Love from myself and Dudley,


Sunday 31 March 2024

Sunday Snippets - Easter Greetings

Happy Easter everyone! And, in many places, including the UK, we put our clocks forward at 2am on Sunday - easy to remember 'Fall, back, Spring, forward'. It always takes me a few days to get over that lost hour of sleep!

There's a new Challenge being run by Sarn, over in the Snippets Playground HERE

My snippets card for today used snippets of pale ivory linen card for the lily, leaf and the backing layer underneath the lily, as well as underneath the lilac coloured frame to peep through the die cut corners:

I used:

- 5.25" x 4" pale ivory linen card blank, tent style

- used Altenew's 'Layered Lily' stamp and matching die set for the flower and leaf- stamping them using a set of SU teeny stamp pads I've had for many years and of course the Misti to help with positioning the layers

- then die cut the flower and leaf before putting it to one side

- to create the lilac 'frame' I used a die from Penny Black's 'Stitched Frames' set of dies to cut into the centre of a piece of  5" x 3.75" lilac card stock

- for the centre panel I used the same Penny Black die to cut into a snippet of pale ivory card. just slightly bigger than the aperture 

- used SU's 'Old Olive' to stamp the Easter Greeting, using an unbranded stamp from a set of Easter stamps

- adhered the pale ivory centre panel to the 'fallout centre' piece of lilac card from when the lilac frame was die cut - this was to add more stability and the 'image panel' stands ever so slightly proud as a result, which is a nice effect in real life 

- still not finished with faffing with the frame, I trimmed a snippet of pale ivory linen card to a whisker smaller than the lilac frame and adhered it to the back of the frame so it showed through the corners of the die cut frame before flipping it over and popping in the centre panel

used very narrow double sided foam tape, with a glue stick, to adhere both the framed image panel in place

- added the lily leave using a glue pen and then the lily flower was added using thin sticky pads

- finally, popped three Memory Box 'Fairy Drops' on and called it done!

Using the Altenew layering stamps and dies is good fun, once you get the hang of it. I bought them in a closing down sale, I'd hesitate to buy at full price what is effectively one flower and a leaf.

On the other hand, you do sometimes get what you pay for with unbranded goods. The Easter sentiments set is really lovely (Amazon UK) but the stamps are soft and floppy and clearly not polymer. I expect they won't stand up to rigorous use. However, they do stamp well plus it's a set I won't use very much anyhow so I can live with that.

I'm entering this card into Darnells NBUS #60 Challenge HERE. The Altenew stamps and dies, Easter sentiment stamps and also the Penny Black set of 'Stitched Frames' were all having a first outing.

Dudley Pupdate: I had a wry smile over in the Snippets Playground when I read that Sarn and I, ably assisted by Dudley, had been hiding Easter eggs! Dudley was doing the 'hole digging' apparently - and lately his doggie instincts have caused some fun here. He's a 'grazer' and likes nothing more than a dish of freshly raw chopped vegetables. Diced sweet (not hot) baby peppers go in a shot and he leaves the diced carrots to sustain him whenever he fancies a nibble, until the remainder are ditched each evening and a fresh lot prepared for him. Obviously he has other food at breakfast and for dinner and our vet is very happy about his diet. His teeth are doing fine but to continue along that road we recently decided to add a whole small carrot into the fun each day to encourage him to chew using his back teeth - which he loved. Err, until, Len found a day old one hidden away in the corner of his study, much as a dog would bury a bone! Dudley looked pretty sheepish when he realised he'd been rumbled and I'm currently standing beside the ladder up to the Playground Treehouse ............... waiting to have a little word in Sarn's ear! 

 /) /)

 (-.-)
0_(“)(“)

With love from Dudley and myself, 


Wednesday 27 March 2024

March 2024 Rudolph Days - Little Town of Bethlehem

It's Helen's Rudolph Days Challenge HERE until the end of the month - and this is my entry:

I used:

- 5.75" x 5.75" square white card blank

- a piece (snippet) of Tonic 'Majestic Gold' card trimmed to 4.25" x 4.25" and set aside

- snippet of black 'velvet' card stock, die cut using Britannia Dies 'Bethlehem Scene' die, trimming away the lovely crescent shaped upper part to leave just the town itself - at 4" wide

- a piece of carefully chosen backing paper from the Altenew 'Celestial' paper pack, trimmed to 4" x 4" to form the background for Bethlehem. Basically, the background paper and some carefully chosen positioning is the real secret to this card with enough light to show through the windows and a pretty aura over the town with a starlit sky for the star to shine down from

- then glued the silhouette Bethlehem town die cut onto the backing paper using a glue pen. 

- glued that layer onto the Majestic Gold layer to form a frame - using Collall All Purpose glue

- die cut a star from a little snippet of 'Majestic Gold' card using the smaller die in the Memory Box 'Star of Wonder' set of two dies and glued it in place using a glue pen

- finally, used very narrow double sided foam tape, with a glue stick, to adhere both the panel onto the front of the card blank

- didn't add a sentiment, it speaks for itself - and there will be an insert of course

Len spotted it on the craft room desk the following morning and exclaimed -'Wow, that is brilliant'! So nice when chaps recognise your work without any prompting!

And of course, I made two the same whilst at it.  Thanks to Sarn for reminding me with one of her recent cards just how eye catching a wider white border can be!


Sunday 24 March 2024

Sunday Snippets - HB2U

I recently made a couple of colour swatches using 'Lindy's Magical shakers' - from the 'Tea and Crumpets' shimmery range. I kept the leftover strips as they're too pretty to just ditch. And this is my snippets card using them:


I used:

- 5.5" x 4.25" white card blank - tent opening

- then die cut a further piece of the same white card using MFT's 'Diagonal Strip Sentiment Cover Up' die and popped the diagonal strips out

- trimmed another piece of the same white card to just a smidgen smaller than the diagonal strip die cut, covered one side with Stick It adhesive paper, peeled off the second backing and carefully adhered it to the back of the diagonal stripes die cut

- that meant I had nine diagonal die cut apertures in the white panel, backed with a nice sticky surface for the next step

- sorted the Lindy's Magical Shaker strips into the order I wanted 

- then used my Cuttlebug to position the strips, mostly one at a time, into the corresponding positions on the back of the die. Die cut them and then popped them into the correct apertures in the die cut white panel

- a lovely friend recently sent me a gorgeous unbranded flora die and I used it to cut a layer of black velvet card then back it with die cut plain black card for stability - all snippets of course. Such a pretty die! 

- die cut 'HB2U' using a Gummiapan die from their fairly recent Mystery Bags offer, again with black velvet card which was then backed with die cut plain black card - all snippets again

- adhered the silhouette die cut and the sentiment across and onto onto the broad white diagonal panel on the card front - using a glue pen

- finally, used very narrow double sided foam tape, with a glue stick, to adhere both the panel onto the front of the card blank

It was a pretty time consuming process but quite rewarding not to have wasted those leftover little strips of Lindy's Magical Shaker samples!

I'd like to enter this card into the following challenge:

- Darnell's NBUS challenge #60 - HERE - some of the 'Magical Shakers', as well as the two dies I used to cut the black velvet card, were having their first outing

Dudley Pupdate: We're all longing for some consistently dry and sunny days here. Meanwhile, Dudley is still snuggling up to us during the night - although I did spot him curled up in his own bed the other night. He seems to like to have a wander around and ring the changes particularly with the night temperatures being quite variable right now. Each day, when I make our bed, I carefully straighten the little fleecy paw printed cover that Dudley has in his bed - it's a good indicator of whether or not he's using the bed as it usually looks as if he's had a wrestling match in there if he has actually slept in it! When he came to us he travelled light with a puppy sized tennis ball, a much loved Monkey toy and his fleece blanket - plus some starter food. All from the breeder to try to help him settle into his new home. It all looked terribly sad looking back. But, he had to go to a new home and we three had chosen one another.


This was within an hour of us arriving back home with the tiny scrap and we, foolishly mistakenly, thought he'd settled in already! Fast forward to during that coming night ............. with Len ending up dozing on a sofa down in the lounge, with Dudley lying on his chest, wrapped in his fleece. so that the heart beat and warmth from Len along with the smell from his doggy Mum 'Dolly' would calm down one inconsolable and almost hysterical Havanese puppy. 

Such a little guy, who Len and I now realise, had a predetermined agenda ........... which meant absolutely NO intention of sleeping alone! EVER! Bless his cotton socks! 

Remember, the results from Challenge #475 are now published in the Snippets Playground HERE. Hope to see you on the swings for the current challenge too - I fully expect Sarn to be gearing up ready for Easter in a week's time!

Love as always, Dudley and yours truly,